AEWS 5주차 - EKS Autoscaling(HPA, VPA, KEDA - 실습)
| 본 글은 가시다님이 진행하시는 AEWS(AWS EKS Workshop Study)를 참여하여 정리한 글입니다. 모르는 부분이 많아서 틀린 내용이 있다면 말씀 부탁드리겠습니다! |
HPA
이제 샘플 애플리케이션을 만들어서 부하를 줬을때 일어나는 현상을 보겠습니다.
# 샘플 애플리케이션 생성(apache)
cat << EOF > php-apache.yaml
apiVersion: apps/v1
kind: Deployment
metadata:
  name: php-apache
spec:
  selector:
    matchLabels:
      run: php-apache
  template:
    metadata:
      labels:
        run: php-apache
    spec:
      containers:
      - name: php-apache
        image: registry.k8s.io/hpa-example
        ports:
        - containerPort: 80
        resources:
          limits:
            cpu: 500m
          requests:
            cpu: 200m
---
apiVersion: v1
kind: Service
metadata:
  name: php-apache
  labels:
    run: php-apache
spec:
  ports:
  - port: 80
  selector:
    run: php-apache
EOF
kubectl apply -f php-apache.yaml
# 확인
kubectl exec -it deploy/php-apache -- cat /var/www/html/index.php
...

# 모니터링 : 터미널2개 사용
watch -d 'kubectl get hpa,pod;echo;kubectl top pod;echo;kubectl top node'
kubectl exec -it deploy/php-apache -- top

# [운영서버 EC2] 파드IP로 직접 접속
PODIP=$(kubectl get pod -l run=php-apache -o jsonpath="{.items[0].status.podIP}")
curl -s $PODIP; echo

# Create the HorizontalPodAutoscaler : requests.cpu=200m - 알고리즘
# Since each pod requests 200 milli-cores by kubectl run, this means an average CPU usage of 100 milli-cores.
# deployment 범위 수정
kubectl autoscale deployment php-apache --cpu-percent=50 --min=1 --max=10

# HPA 설정 확인
kubectl describe hpa
# 반복 접속 1 (파드1 IP로 접속) >> 증가 확인 후 중지
while true;do curl -s $PODIP; sleep 0.5; done

# 반복 접속 2 (서비스명 도메인으로 파드들 분산 접속) >> 증가 확dls 후 중지
## >> [scale back down] 중지 5분 후 파드 갯수 감소 확인
# Run this in a separate terminal
# so that the load generation continues and you can carry on with the rest of the steps
kubectl run -i --tty load-generator --rm --image=busybox:1.28 --restart=Never -- /bin/sh -c "while sleep 0.01; do wget -q -O- http://php-apache; done"


이제 부하생성기를 중지 후 pod의 개수가 줄어듬을 확인해봅니다. (scale in)


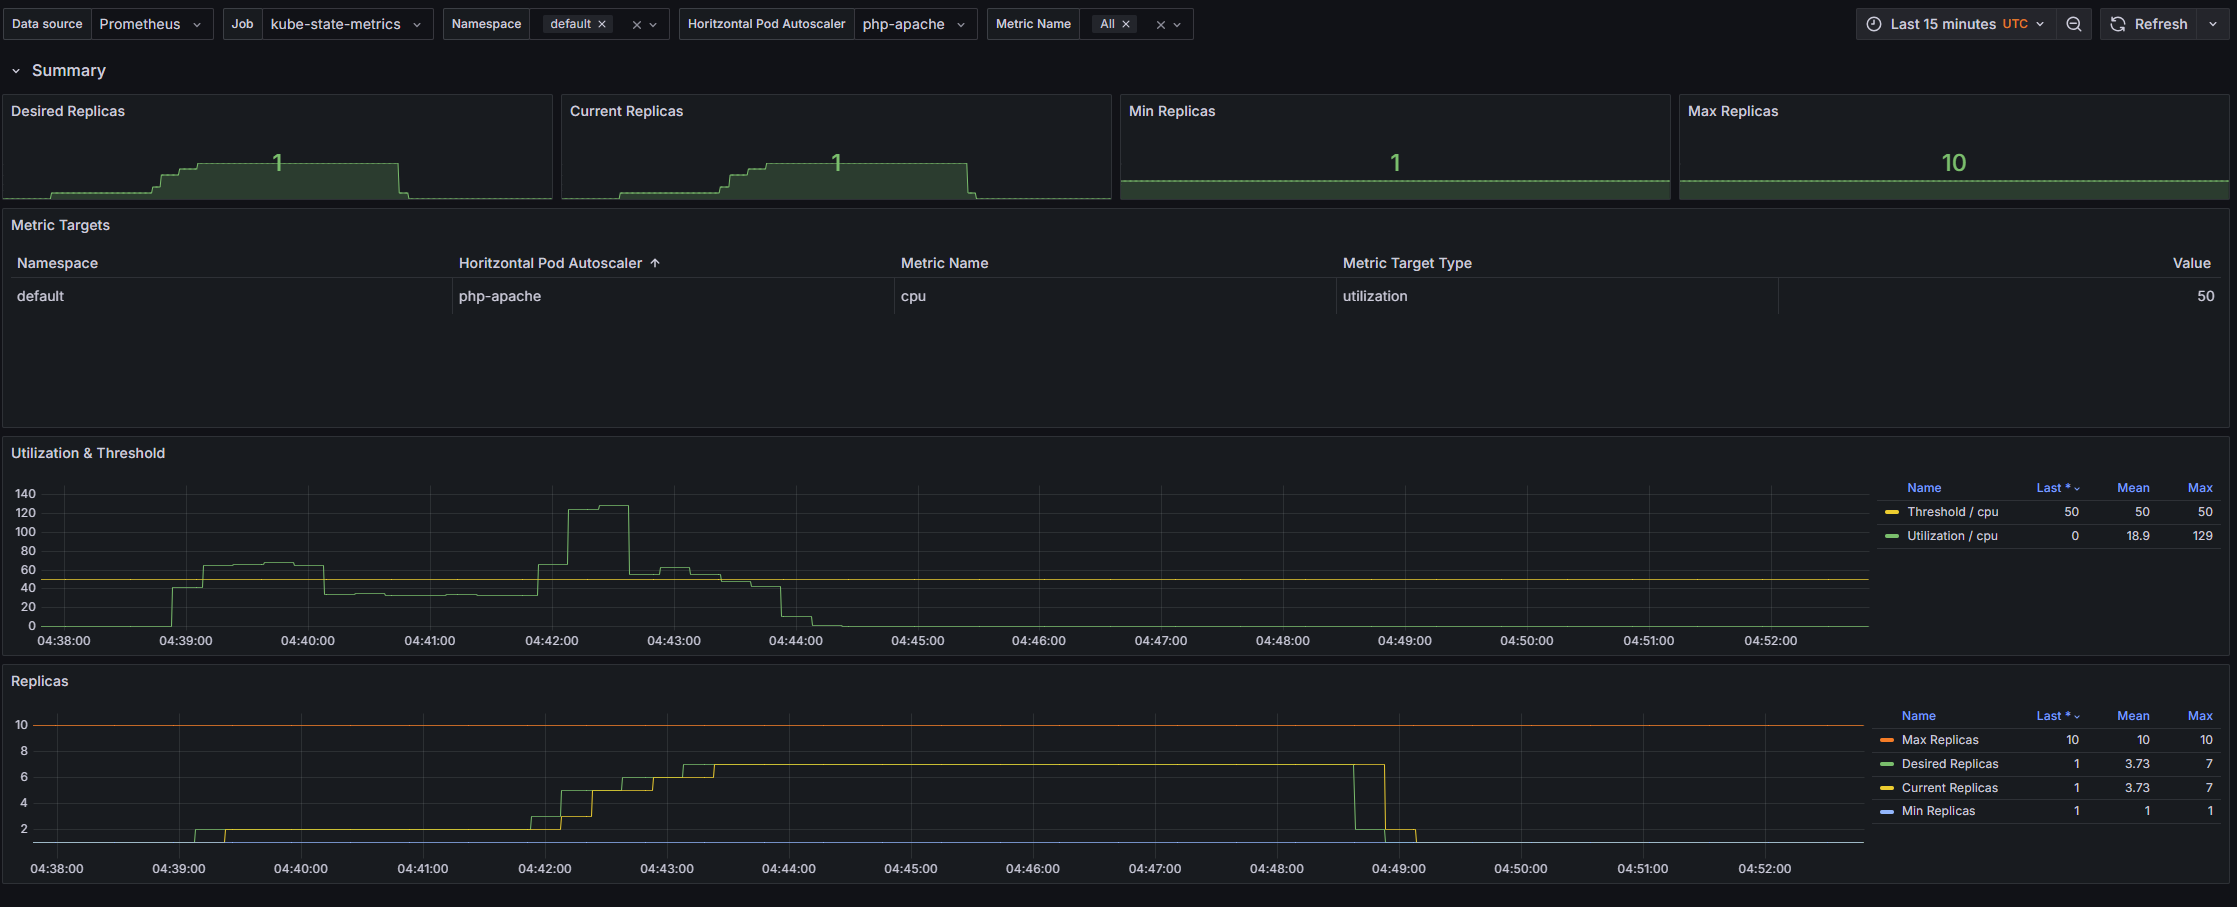
약 6분후 파드의 개수가 줄어듬을 확인할 수 있었습니다. (7->1)
이는 그라파나에서 더 직관적이게 확인이 가능합니다. (22128, 22251)


$ 삭제
kubectl delete deploy,svc,hpa,pod --all
VPA


특징
- VPA는 HPA와 같이 사용할 수 없습니다.
- VPA는 pod자원을 최적값으로 수정하기 위해 pod를 재실행(기존 pod를 종료하고 새로운 pod실행)합니다.
- 계산 방식 : ‘기준값(파드가 동작하는데 필요한 최소한의 값)’ 결정 → ‘마진(약간의 적절한 버퍼)’ 추가
다른 분이 너무 정리를 잘해주셔서 해당 글을 참고해주시면 감사하겠습니다.
https://malwareanalysis.tistory.com/603
EKS 스터디 - 5주차 1편 - VPA
VPA란? VPA(Vertical Pod Autoscaler)는 pod resources.request을 최대한 최적값으로 수정합니다. 수정된 request값이 기존 값보다 위 또는 아래 범위에 속하므로 Vertical라고 표현합니다. pod마다 resource.request를 최
malwareanalysis.tistory.com

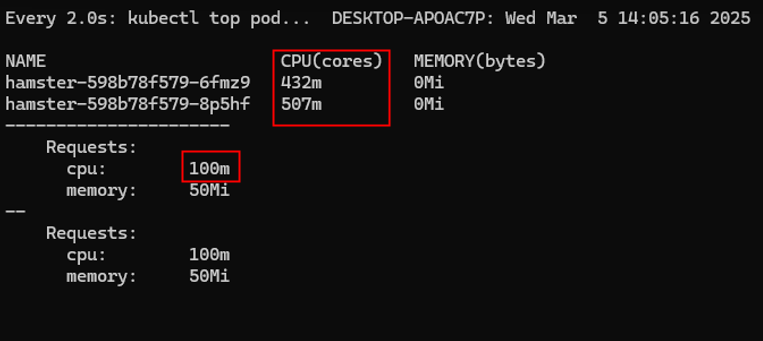
확대해보면 아래와 같습니다.

이후 분산을 받고 실제 requets의 양이 증가합니다.
(캡쳐를 날려서 사진은 생략하겠습니다.)

KEDA
# KEDA 설치 : serviceMonitor 만으로도 충분할듯..
cat <<EOT > keda-values.yaml
metricsServer:
  useHostNetwork: true

prometheus:
  metricServer:
    enabled: true
    port: 9022
    portName: metrics
    path: /metrics
    serviceMonitor:
      # Enables ServiceMonitor creation for the Prometheus Operator
      enabled: true
    podMonitor:
      # Enables PodMonitor creation for the Prometheus Operator
      enabled: true
  operator:
    enabled: true
    port: 8080
    serviceMonitor:
      # Enables ServiceMonitor creation for the Prometheus Operator
      enabled: true
    podMonitor:
      # Enables PodMonitor creation for the Prometheus Operator
      enabled: true
  webhooks:
    enabled: true
    port: 8020
    serviceMonitor:
      # Enables ServiceMonitor creation for the Prometheus webhooks
      enabled: true
EOT

helm repo add kedacore https://kedacore.github.io/charts
helm repo update
helm install keda kedacore/keda --version 2.16.0 --namespace keda --create-namespace -f keda-values.yaml
# KEDA 설치 확인
kubectl get crd | grep keda
# CPU/Mem은 기존 metrics-server 의존하여, KEDA metrics-server는 외부 이벤트 소스(Scaler) 메트릭을 노출
## https://keda.sh/docs/2.16/operate/metrics-server/
kubectl get pod -n keda -l app=keda-operator-metrics-apiserver
kubectl get --raw "/apis/external.metrics.k8s.io/v1beta1" | jq

그럼 동작을 테스트하기 위해 deployment를 배포합니다.
cat << EOF > php-apache.yaml
apiVersion: apps/v1
kind: Deployment
metadata:
  name: php-apache
spec:
  selector:
    matchLabels:
      run: php-apache
  template:
    metadata:
      labels:
        run: php-apache
    spec:
      containers:
      - name: php-apache
        image: registry.k8s.io/hpa-example
        ports:
        - containerPort: 80
        resources:
          limits:
            cpu: 500m
          requests:
            cpu: 200m
---
apiVersion: v1
kind: Service
metadata:
  name: php-apache
  labels:
    run: php-apache
spec:
  ports:
  - port: 80
  selector:
    run: php-apache
EOF

# keda 네임스페이스에 디플로이먼트 생성
kubectl apply -f php-apache.yaml -n keda
# ScaledObject 정책 생성 : cron
cat <<EOT > keda-cron.yaml
apiVersion: keda.sh/v1alpha1
kind: ScaledObject
metadata:
  name: php-apache-cron-scaled
spec:
  minReplicaCount: 0
  maxReplicaCount: 2  # Specifies the maximum number of replicas to scale up to (defaults to 100).
  pollingInterval: 30  # Specifies how often KEDA should check for scaling events
  cooldownPeriod: 300  # Specifies the cool-down period in seconds after a scaling event
  scaleTargetRef:  # Identifies the Kubernetes deployment or other resource that should be scaled.
    apiVersion: apps/v1
    kind: Deployment
    name: php-apache
  triggers:  # Defines the specific configuration for your chosen scaler, including any required parameters or settings
  - type: cron
    metadata:
      timezone: Asia/Seoul
      start: 00,15,30,45 * * * *
      end: 05,20,35,50 * * * *
      desiredReplicas: "1"
EOT
kubectl apply -f keda-cron.yaml -n keda

yaml파일을 보면 15분마다 pod가 실행되고 5분후에 꺼지는 cron이 걸려있습니다.

45분에 1개의 php-apache pod가 생성되었음을 확인 가능합니다.
# 그라파나 대시보드 추가 : 대시보드 상단에 namespace : keda 로 변경하기!
# KEDA 대시보드 Import : https://github.com/kedacore/keda/blob/main/config/grafana/keda-dashboard.json
